


Peugeot 205 Manual
Fuel injection system - checks and adjustmentFuel system - multi-point fuel injection engines / Fuel injection system - checks and adjustment
General information
1 If a fault appears in the fuel injection
system, first ensure that all the system wiring
connectors are securely connected and free
of corrosion. Ensure that the fault is not due to
poor maintenance; ie, check that the air
cleaner filter element is clean, the spark plugs
are in good condition and correctly gapped,
the valve clearances are correctly adjusted,
the cylinder compression pressures are
correct, the ignition timing is correct (where
adjustable), and that the engine breather
hoses are clear and undamaged, referring to
Chapters 1, 2 and 5 for further information.
2 If these checks fail to reveal the cause of the problem, carry out the checks and adjustments described in the following subsections which represent the limit of work that can be done without sophisticated test equipment. If problems still exist, the vehicle should be taken to a suitably-equipped Peugeot dealer for testing. A wiring block connector is incorporated in the engine management circuit, into which a special electronic diagnostic tester can be plugged.
The tester will locate the fault quickly and simply, alleviating the need to test all the system components individually, which is a time-consuming operation that also carries a risk of damaging the ECU.
Checks and adjustment
Idle speed and mixture CO content
3 Refer to Chapter 1.
Throttle initial position - LE2-Jetronic
system
4 Run the engine to normal operating
temperature - indicated when the electric
cooling fan has cut in and out twice. The
ignition timing must be correctly adjusted, as
described in Chapter 5B.
5 Connect a vacuum gauge to the test point in the distributor vacuum advance line (see illustration).
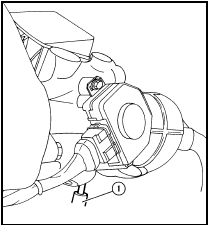
10.5 To check the throttle initial position, connect a vacuum gauge to the
test point (1)
6 Check that the throttle movement is smooth.
7 With the engine stopped turn the air screw fully in (see illustration).
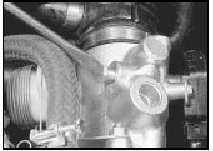
10.7 Turn the air screw fully in
8 Prise the tamperproof cap from the throttle stop screw (see illustration).
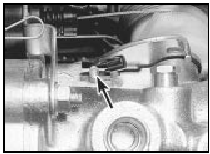
10.8 Prise the tamperproof cap from the throttle stop screw (arrowed) and
adjust as described in text
9 Unscrew the throttle stop screw then retighten it until it just touches the throttle lever. Tighten the screw a further four complete turns.
10 Start the engine and allow it to idle. Turn the throttle stop screw to obtain an idle speed of 650 rpm (XU5J engines) or 600 rpm (XU5JA and XU9JA engines). Check that the vacuum reading shown on the gauge does not exceed 50 mm Hg (65 mbar) and if necessary adjust the throttle stop screw.
11 Now turn the air screw in the throttle housing as necessary to obtain the specified idling speed.
12 Stop the engine and adjust the throttle switch, as described below.
Throttle initial position - LU2-Jetronic and Motronic M1.3 systems 13 The throttle initial position is set in production, and will not normally require adjustment unless the throttle housing has been tampered with. Adjustment should be entrusted to a Peugeot dealer.
Throttle switch - LE2-Jetronic system 14 Pull the connector from the throttle switch (see illustration).
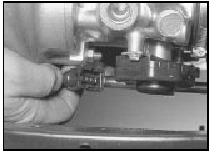
10.14 Removing the throttle switch connector
15 Connect a voltmeter between the middle terminal on the connector and earth.
16 Pull the connector from the ignition amplifier (see Chapter 5B), then operate the starter motor and check that there is a reading of at least 9 volts.
17 Disconnect the air hose from the throttle housing.
18 On all engines except XU5JA and XU9JA, position a 0.30 mm feeler blade between the throttle stop screw and the throttle lever.
19 Loosen the two throttle switch screws.
20 Connect an ohmmeter between terminals 18 and 2 on the throttle switch, then rotate the switch until the internal contacts close and the reading is zero ohms. Tighten the screws with the switch in this position.
21 Remove the feeler blade (where applicable) and on all engines, insert in its place a 0.70 mm feeler blade. The internal contacts should now be separated and the reading on the ohmmeter infinity. If not, repeat the procedure in paragraph 19.
22 Remove the feeler blade.
23 Check the full throttle operation by connecting an ohmmeter between terminals 18 and 3, then fully opening the throttle so that dimension X is 4.0 mm (see illustration).
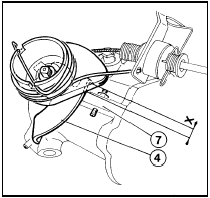
10.23 Full throttle dimension “X”
4 Throttle lever
7 Throttle housing
X = 4.0 mm
The internal contacts should close and the ohmmeter reading be zero.
24 If the switch does not operate correctly it should be renewed.
Throttle switch - LU2-Jetronic and
Motronic M1.3 systems
25 The throttle initial position must be correct
before attempting to adjust the throttle switch.
26 Slacken the throttle switch securing screws.
27 Turn the switch unit fully clockwise, then turn it slowly back until the idling contacts are heard to close.
28 Tighten the securing screws.
29 Pull the wiring from the switch, then connect an ohmmeter between terminals 2 and 18 in the switch (see illustration). The ohmmeter should read zero.
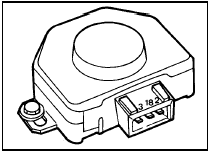
10.29 Throttle switch terminal identification - LU2-Jetronic and Motronic
M1.3 systems
30 Operate the throttle linkage, and the ohmmeter should read infinity.
31 If the readings are not correct, repeat the procedure described in paragraphs 26 to 30 inclusive.
32 Connect the ohmmeter between switch terminals 3 and 18. The ohmmeter should read infinity.
33 Fully open the throttle, and the ohmmeter should read zero.
34 If the specified readings cannot be obtained, renew the switch.
35 Reconnect the switch wiring plug on completion.


