Peugeot 205 Manual
Timing belt tensioner and sprockets - removal, inspection and refittingTU series engine in-car repair procedures / Timing belt tensioner and sprockets - removal, inspection and refitting
Note: This Section describes the removal and refitting of the components concerned as individual operations. If more than one of them is to be removed at the same time, start by removing the timing belt as described in Section 7; remove the actual component as described below, ignoring the preliminary dismantling steps.
Removal
1 Disconnect the battery negative lead.
2 Position the engine assembly/valve timing holes as described in Section 3, and lock both the camshaft sprocket and flywheel in position. Do not attempt to rotate the engine whilst the pins are in position.
Camshaft sprocket
3 Remove the centre timing belt cover as
described in Section 6.
4 Loosen the timing belt tensioner pulley retaining nut. Rotate the pulley in a clockwise direction, using a suitable square-section key fitted to the hole in the pulley hub, then retighten the retaining nut.
5 Disengage the timing belt from the sprocket, and move the belt clear, taking care not to bend or twist it sharply. Remove the locking pin from the camshaft sprocket.
6 Slacken the camshaft sprocket retaining bolt and remove it, along with its washer. To prevent the camshaft rotating as the bolt is slackened, restrain the sprocket with a suitable tool through the holes in the sprocket face (see Tool Tip). Do not attempt to use the sprocket locking pin to prevent the sprocket from rotating whilst the bolt is slackened.
7 With the retaining bolt removed, slide the sprocket off the end of the camshaft. If the locating peg is a loose fit in the rear of the sprocket, remove it for safe-keeping. Examine the camshaft oil seal for signs of oil leakage and, if necessary, renew it as described in Section 9.
Crankshaft sprocket
8 Remove the centre and lower timing belt
covers as described in Section 6.
9 Loosen the timing belt tensioner pulley retaining nut. Rotate the pulley in a clockwise direction, using a suitable square-section key fitted to the hole in the pulley hub, then retighten the retaining nut.
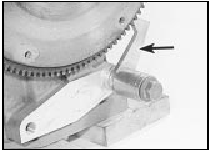
10 To prevent crankshaft rotation whilst the sprocket retaining bolt is slackened, select top gear, and have an assistant apply the brakes firmly. If the engine has been removed from the vehicle, lock the flywheel ring gear, using an arrangement similar to that shown (see illustration).

8.10 Use the tool shown to lock the flywheel ring gear and prevent the
crankshaft rotating
Do not be tempted to use the flywheel locking pin to prevent the crankshaft from rotating; temporarily remove the locking pin from the rear of the flywheel prior to slackening the pulley bolt, then refit it once the bolt has been slackened.
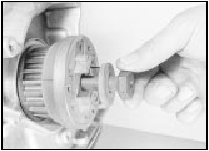
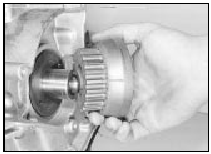
11 Unscrew the retaining bolt and washer, then slide the sprocket off the end of the crankshaft (see illustrations). Refit the locating pin to the rear of the timing hole in the rear of the flywheel.

8.11a Remove the crankshaft sprocket bolt . . .

8.11b . . . then slide off the sprocket
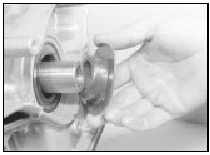
12 If the Woodruff key is a loose fit in the crankshaft, remove it and store it with the sprocket for safe-keeping. If necessary, also slide the flanged spacer off the end of the crankshaft (see illustration).

8.12 Remove the flanged spacer if necessary
Examine the crankshaft oil seal for signs oil leakage and, if necessary, renew as described in Section 14.
Tensioner pulley
13 Remove the centre timing belt cover as
described in Section 6.
14 Slacken and remove the timing belt tensioner pulley retaining nut, and slide the pulley off its mounting stud. Examine the mounting stud for signs of damage and, if necessary, renew it.
Inspection
15 Clean the sprockets thoroughly, and renew
any that show signs of wear, damage or cracks.
16 Clean the tensioner assembly, but do not use any strong solvent which may enter the pulley bearing. Check that the pulley rotates freely about its hub, with no sign of stiffness or of free play. Renew the tensioner pulley if there is any doubt about its condition, or if there are any obvious signs of wear or damage.
Refitting
Camshaft sprocket
17 Refit the locating peg (where removed) to
the rear of the sprocket, then locate the
sprocket on the end of the camshaft. Ensure
that the locating peg is correctly engaged with
the cut-out in the camshaft end.
18 Refit the sprocket retaining bolt and washer. Tighten the bolt to the specified torque, whilst retaining the sprocket with the tool used on removal.
19 Realign the timing hole in the camshaft sprocket (see Section 3) with the corresponding hole in the cylinder head, and refit the locking pin.
20 Refit the timing belt to the camshaft sprocket. Ensure that the “front run” of the belt is taut - ie, ensure that any slack is on the tensioner pulley side of the belt. Do not twist the belt sharply while refitting it, and ensure that the belt teeth are seated centrally in the sprockets.
21 Loosen the tensioner pulley retaining nut.
Rotate the pulley anti-clockwise to remove all free play from the timing belt, then retighten the nut.
22 Tension the belt as described in paragraphs 14 to 19 of Section 7.
23 Refit the timing belt covers as described in Section 6.
Crankshaft sprocket
24 Where removed, locate the Woodruff key
in the crankshaft end, then slide on the
flanged spacer, aligning its slot with the
Woodruff key.
25 Align the crankshaft sprocket slot with the Woodruff key, and slide it onto the end of the crankshaft.
26 Temporarily remove the locking pin from the rear of the flywheel, then refit the crankshaft sprocket retaining bolt and washer. Tighten the bolt to the specified torque, whilst preventing crankshaft rotation using the method employed on removal. Refit the locking pin to the rear of the flywheel.
27 Relocate the timing belt on the crankshaft sprocket. Ensure that the “front run” of the belt is taut - ie, ensure that any slack is on the tensioner pulley side of the belt. Do not twist the belt sharply while refitting it, and ensure that the belt teeth are seated centrally in the sprockets.
28 Loosen the tensioner pulley retaining nut.
Rotate the pulley anti-clockwise to remove all free play from the timing belt, then retighten the nut.
29 Tension the belt as described in paragraphs 14 to 19 of Section 7.
30 Refit the timing belt covers as described in Section 6.
Tensioner pulley
31 Refit the tensioner pulley to its mounting
stud, and fit the retaining nut.
32 Ensure that the “front run” of the belt is taut - ie, ensure that any slack is on the pulley side of the belt. Check that the belt is centrally located on all its sprockets. Rotate the pulley anti-clockwise to remove all free play from the timing belt, then tighten the pulley retaining nut securely.
33 Tension the belt as described in paragraphs 14 to 19 of Section 7.
34 Refit the timing belt covers as described in Section 6.


