


Peugeot 205 Manual
Timing belt - general information, removal and refittingXU series engine in-car repair procedures / Timing belt - general information, removal and refitting
General information
1 The timing belt drives the camshaft and
coolant pump from a toothed sprocket on the
front of the crankshaft. If the belt breaks or
slips in service, the pistons are likely to hit the
valve heads, resulting in extensive (and
expensive) damage.
2 The timing belt should be renewed at the specified intervals (see Chapter 1), or earlier if it is contaminated with oil, or if it is at all noisy in operation (a “scraping” noise due to uneven wear).
3 If the timing belt is being removed, it is a wise precaution to check the condition of the coolant pump at the same time (check for signs of coolant leakage). This may avoid the need to remove the timing belt again at a later stage, should the coolant pump fail.
Removal
4 Disconnect the battery negative lead.
5 Remove the auxiliary drivebelt as described in Chapter 1.
6 Remove the inner shield from the right-hand wheel arch and wedge the radiator bottom hose under the sump.
7 Remove the shield from the camshaft sprocket.
8 Remove the plastic covers from the front of the timing belt. Note the location of the various bolts.
9 Observe the timing belt tensioner assembly and ascertain whether it is of the springloaded type or the later eccentric roller type (see illustration). Proceed as follows under the appropriate sub-heading according to type fitted.
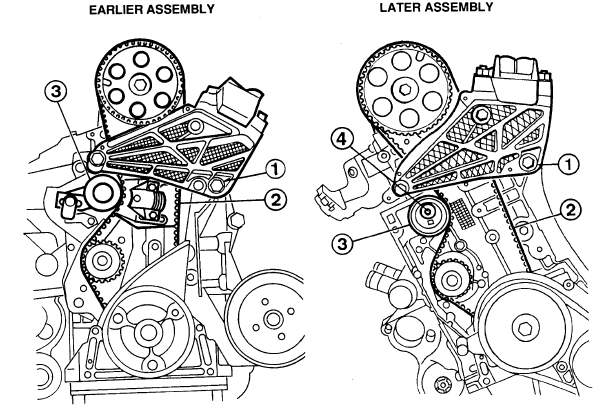
4.9 Spring loaded timing belt tensioner (earlier assembly) and eccentric
roller type tensioner (later assembly)
1 Right-hand engine mounting
2 Timing belt
3 Tensioner roller
4 Tensioner roller nut
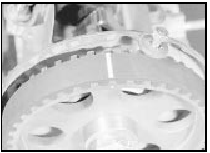
Models with spring-loaded tensioner 10 Turn the crankshaft using a spanner on the pulley bolt until the dowel hole in the pulley is at about 12 o’clock and the hole in the camshaft sprocket is at about 7 o’clock. In this position a 10 mm dowel should pass through each hole and into the timing recess behind. Verify this and then remove the dowels (see illustration).
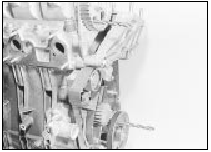
4.10 Crankshaft and camshaft sprockets locked with timing dowels
11 Remove the clutch bottom shield. Have an assistant jam the starter ring gear while the crankshaft pulley bolt is undone. This bolt is very tight. Do not jam the pulley by means of the timing dowel: damage will result. Remove the bolt and washer.
12 Check that the 10 mm dowels will still enter the timing holes: adjust the crankshaft position if necessary by means of the starter ring gear. Remove the crankshaft pulley, retrieving the Woodruff key if it is loose.
13 Slacken the two nuts on the front of the timing belt tensioner and the single nut at the rear. Use a spanner on the square end of the tensioner cam spindle to turn the cam to the horizontal position and so compress the tensioner spring (see illustrations). Tighten the cam locknut.
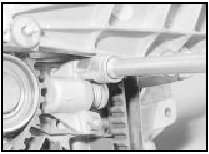
4.13a Slacken the two nuts at the front of the timing belt tensioner . . .
4.13b . . . and turn the tensioner cam spindle to the horizontal position
14 Remove the timing belt, taking care not to kink it or contaminate it with oil if it is to be re-used. Draw an arrow on the belt using chalk to mark the running direction unless a new belt is to be fitted.
15 Check the timing belt carefully for any signs of uneven wear, splitting, or oil contamination. Pay particular attention to the roots of the teeth. Renew it if there is the slightest doubt about its condition. If the engine is undergoing an overhaul, and has covered more than 36 000 miles (60 000 km) with the existing belt fitted, renew the belt as a matter of course, regardless of its apparent condition. The cost of a new belt is nothing compared with the cost of repairs, should the belt break in service. If signs of oil contamination are found, trace the source of the oil leak and rectify it. Wash down the engine timing belt area and all related components, to remove all traces of oil. If the timing belt is to be renewed, ensure that the correct belt type is obtained - the timing belt used with the earlier spring-loaded tensioner is not interchangeable with the later type.
Models with eccentric roller tensioner Note: Peugeot specify the use of special tool (SEEM C. TRONIC type 105 or 105.5 belt tension measuring equipment) to correctly set the belt tension. If this equipment cannot be obtained, an approximate setting can be achieved using the method described below.
If the method described here is used, the tension must be checked using the special equipment at the earliest opportunity. Do not drive the vehicle over large distances, or use high engine speeds until the belt tension is known to be correct. Refer to a Peugeot dealer for advice.
16 Proceed as described in paragraphs 10 to 12, noting that the crankshaft pulley timing dowel must be of 10 mm diameter, stepped down to 8 mm at one end to engage with the smaller hole in the timing recess.
17 Slacken the tensioner roller bolt to relieve the belt tension, then withdraw the belt, noting the direction of fitting and the markings. Take care not to kink it or contaminate it with oil if it is to be re-used. Draw an arrow on the belt using chalk to mark the running direction unless a new belt is to be fitted.
18 Examine the belt carefully with reference to paragraph 15.
Refitting
Models with spring-loaded tensioner
19 Commence refitting by positioning the
belt on the crankshaft sprocket, then refitting
the pulley and verifying the correct position of
the crankshaft by means of the dowel.
Observe the arrows on the belt showing the direction of rotation, and the timing lines which align with marks on the crankshaft and camshaft sprockets (see illustration).
4.19 Timing line on belt aligned with mark on camshaft sprocket
20 Fit the belt to the camshaft sprocket, round the tensioner and to the coolant pump sprocket.
21 Release the tensioner cam locknut and turn the cam downwards to release the spring. Tighten the locknut and the tensioner front nuts.
22 Remove the timing dowels and turn the crankshaft through two full turns in the normal direction of rotation. Turn the crankshaft further to bring No 1 piston to TDC on the firing stroke.
23 Slacken the tensioner front nuts and the cam locknut, then retighten them.
24 Turn the crankshaft further and make sure that the timing dowels can still be inserted. If not, remove the drivebelt and start again.
25 If a new belt has been fitted, it must be run in and retensioned, as follows.
26 Tighten the crankshaft pulley bolt to the specified torque, then refit and tension the auxiliary drivebelt (see Chapter 1). Temporarily refit the camshaft sprocket cover.
27 Run the engine up to operating temperature, indicated by the cooling fan operating, then stop it and allow it to cool for at least two hours.
28 Rotate the crankshaft to the TDC position, No 1 cylinder firing, then slacken and retighten the tensioner nuts once more.
29 Remove the auxiliary drivebelt and the crankshaft pulley. Refit and secure the plastic covers, then refit the pulley and tighten its bolts to the specified torque. Refit and tension the auxiliary drivebelt.
30 Check the ignition timing and adjust if necessary (Chapter 5B).
Models with eccentric roller tensioner 31 Commence refitting by slipping the belt over the camshaft sprocket, followed by the crankshaft sprocket, the coolant pump sprocket, and finally over the tensioner roller.
Observe the arrows on the belt indicating the direction of rotation, and the timing lines which align with corresponding marks on the crankshaft and camshaft sprockets.
32 With the camshaft timing dowel fitted, rotate the tensioner roller anti-clockwise by hand as far as possible to take up any slack in the belt, then tighten the tensioner roller bolt sufficiently to hold the roller in position. If the special belt tension measuring equipment is available, it should be fitted to the tensioned run of the belt, and the tensioner roller should be moved to give a reading of 30 ± 2 units.
Tighten the roller bolt to the specified torque, taking care not to move the roller as the bolt is tightened.
33 Check that the crankshaft and camshaft are still positioned correctly by temporarily refitting the crankshaft pulley and re-inserting the timing dowel.
34 Remove the timing dowels, temporarily refit the crankshaft pulley, and turn the crankshaft through two full turns in the normal direction of rotation. Check that both timing dowels can still be inserted. If not, remove the drivebelt and start again. Never turn the crankshaft backwards during this procedure.
35 If all is well, remove the dowels, and turn the crankshaft through two further turns in the normal direction of rotation.
36 Refit the camshaft timing dowel, and check that the belt can just be twisted through 90° (using moderate pressure from the forefinger and thumb) at the midpoint of the longest belt run between the camshaft and crankshaft sprockets. If in doubt about this setting, it is better to err on the tight side until the tension can be checked by a Peugeot dealer; if the belt is too slack, it may jump on the sprockets, which could cause serious engine damage. If the special belt tension measuring equipment is available, it should be refitted to the tensioned run of the belt. The reading should now be between 42 and 46 units.
37 If the tension is not as specified, repeat the tensioning operation.
38 Refit the belt covers and the crankshaft pulley. Apply thread locking compound to the crankshaft pulley bolt threads, and tighten the bolt to the specified torque.
39 On completion, refit all disturbed components, and tension the auxiliary drivebelt, as described in Chapter 1.


