


Peugeot 205 Manual
Valve clearances - checking and adjustmentXU series engine in-car repair procedures / Valve clearances - checking and adjustment
Note: The valve clearances must be checked and adjusted only when the engine is cold.
1 The importance of having the valve clearances correctly adjusted cannot be overstressed, as they vitally affect the performance of the engine. If the clearances are too big, the engine will be noisy (characteristic rattling or tapping noises) and engine efficiency will be reduced, as the valves open too late and close too early. A more serious problem arises if the clearances are too small, however. If this is the case, the valves may not close fully when the engine is hot, resulting in serious damage to the engine (eg. burnt valve seats and/or cylinder head warping/cracking).
Checking
2 Remove the air cleaner and ducts as
described in the relevant Part of Chapter 4.
3 Disconnect the brake servo vacuum hose.
4 Remove the camshaft cover, trying not to damage the gasket.
5 Have ready a pencil and paper to record the measured clearances.
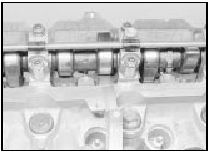
6 Turn the crankshaft using a spanner on the crankshaft pulley bolt until the cam lobe nearest the flywheel end of the engine is pointing vertically upwards (see illustration).
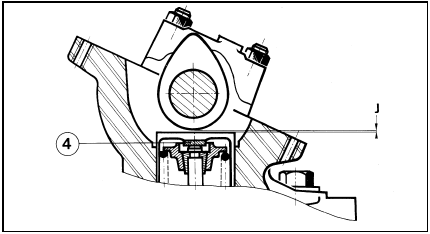
2.6 Valve clearance is measured at point J and altered by shim (4)
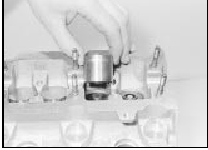
7 Using feeler blades, measure the clearance between the base of the cam and the cam follower (see illustration). Record the clearance.
2.7 Using feeler blades to measure a valve clearance
8 Repeat the measurement for the other seven valves, turning the crankshaft as necessary so that the cam lobe in question is always vertically upwards.
9 Calculate the difference between each measured clearance and the desired value (see Specifications). Note that the value for inlet valves is different from that for exhaust.
Counting from either end of the engine, the
valve sequence is:
Exhaust - Inlet - Inlet - Exhaust - Exhaust -
Inlet - Inlet - Exhaust.
10 If any clearance measured is outside the specified tolerance, adjustment must be carried out as described below. If all clearances are within tolerance, refit the camshaft cover, using a new gasket if necessary. Note the diagnostic socket and copper washer under the bolt at the timing belt end on certain engines.
Adjustment
11 To adjust the clearances remove the
camshaft as described in Section 7.
12 Lift off a cam follower and its shim. Be careful that the shim does not fall out of the follower. Clean the shim and measure its thickness with a micrometer (see illustrations).
2.12a Lift off the cam follower and shim . . .
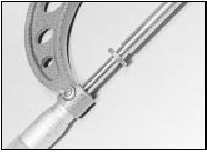
2.12b . . . then measure the shim thickness with a micrometer
13 Refer to the clearance recorded for the valve concerned. If the clearance was larger than specified, a thicker shim must be fitted; if the clearance was too small, a thinner shim must be fitted.
Sample calculation - clearance too
large:
Desired clearance (A) 0.20 mm
Measured clearance (B) 0.28 mm
Difference (B - A) = + 0.08 mm
Original shim thickness 2.62 mm
Req’d shim thickness 2.62 + 0.08 = 2.70 mm
Sample calculation - clearance too
small:
Desired clearance (A) 0.40 mm
Measured clearance (B) 0.23 mm
Difference (B-A) = -0.17 mm
Original shim thickness 2.86 mm
Req’d shim thickness 2.86 - 0.17 = 2.69 mm
14 Shims are available in thicknesses from
1.650 to 4.000 mm, in steps of 0.025 mm in
the middle of the range and at the ends in
steps of 0.075 mm. Clean new shims before
measuring or fitting them.
15 Repeat the operations on the other cam followers and shims, keeping each follower identified so that it can be refitted in the same position.
16 When reassembling, oil the shim and fit it on the valve stem, then oil the cam follower and lower it smoothly into position. If the follower is raised at any stage the shim may be dislodged.
17 When all the followers are in position with their shims, refit the camshaft. Check the valve clearances before refitting the timing belt in case a mistake has been made and the camshaft has to be removed again. With the timing belt disconnected the camshaft will not be moved by rotation of the crankshaft.
Before rotating the camshaft alone, position all the pistons halfway down the bores to avoid piston-to-valve contact.


