


Peugeot 205 Manual
Timing chain, tensioner and sprockets - removal and refittingXV, XW and XY engines in-car repair procedures / Timing chain, tensioner and sprockets - removal and refitting
Removal
1 Support the engine/transmission on a
trolley jack with a block of wood as an
insulator.
2 Release the nuts on the right-hand flexible engine mounting at the base of the timing chain cover.
3 Raise the engine just enough to clear the side-member and anti-roll bar.
4 Remove the auxiliary drivebelt as described in Chapter 1, and the fuel pump as described in Chapter 4A.
5 Unscrew and remove the crankshaft pulley nut. To do this the crankshaft must be held against rotation by jamming the starter ring gear. Remove the starter, as described in Chapter 5A. Alternatively, if an assistant is available, apply the brakes fully with a gear engaged. Withdraw the pulley.
6 Unbolt and remove the rocker cover, and disconnect the spark plug HT leads.
7 Unscrew and remove the timing chain cover bolts. Take off the cover and extract the fuel pump operating rod.
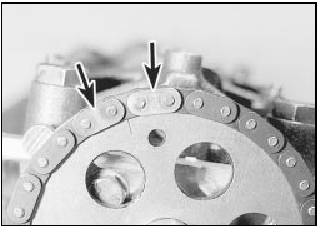
8 Turn the crankshaft either by temporarily refitting the pulley nut or by engaging a gear and turning a front wheel (raised) until the timing marks are located in the following positions. Camshaft sprocket mark between two bright links on chain. Crankshaft sprocket mark opposite centre of single bright link (see illustration).
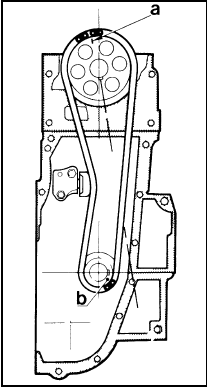
4.8 Sprocket timing marks and timing chain bright links aligned
a Camshaft sprocket timing mark b Crankshaft sprocket timing mark
9 Remove the crankshaft oil pump drivegear and its Woodruff key.
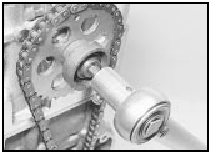
10 Unbolt the oil pump. Some socket-headed screws are accessible through the holes in the driven gear (see illustration).

4.10a Removing oil pump screw with Allen key
Lift off the pump and spacer plate (see illustration).
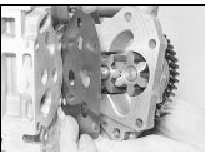
4.10b Removing the oil pump and spacer plate
11 Jam the camshaft sprocket and unscrew the sprocket retaining bolt. Take off the fuel pump operating eccentric.
12 Turn the lock on the chain tensioner anti-clockwise to lock it in its retracted state (see illustration).
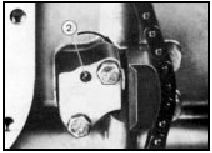
4.12 Timing chain tensioner lock (2)
Turn in direction of arrow to release slipper - turn in opposite direction to retract slipper
13 Remove the camshaft sprocket with timing chain.
14 Thoroughly clean all the removed components ensuring that all traces of old gasket are removed from the timing cover, rocker cover and engine mating faces.
15 Examine the teeth of both sprockets for wear. Each tooth on a sprocket is an inverted V-shape and wear is apparent when one side of the tooth becomes more concave in shape than the other. When badly worn, the teeth become hoop-shaped and the sprockets must be renewed. The crankshaft sprocket and oil pump drive gear are removed by sliding them off the crankshaft with their Woodruff keys.
16 If the sprockets need to be renewed then the chain will have worn also and should also be renewed. If the sprockets are satisfactory, examine the chain and look for play between the links. When the chain is held out horizontally, it should not bend appreciably.
Remember, a chain is only as strong as its weakest link and, being a relatively cheap item, it is worthwhile fitting a replacement anyway.
17 Check the condition of the tensioner slipper. If it is worn, renew it; it is held in position by two bolts. If the tensioner is removed, note the fine mesh filter screen located behind the tensioner body. Ensure that it is clean and in place when refitting the tensioner.
18 Inspect the oil pump drive gears for wear or damage and renew if necessary. Always fit a new timing cover oil seal (see Section 8).
Refitting
19 Check that the crankshaft is positioned
correctly by observing the crankshaft
sprocket keyway which should be in
alignment with the crankcase joint (see
illustration 4.8). Turn the crankshaft if
necessary to bring it to the correct position.
Temporarily fit the camshaft sprocket and rotate the camshaft until the keyway is also positioned as shown.
20 Engage the chain around the crankshaft sprocket so that the timing mark on the sprocket is in the centre of the single bright link on the chain (see illustration).
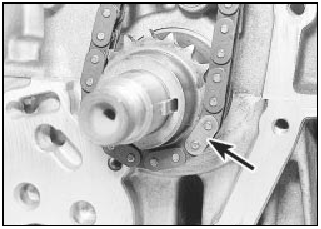
4.20 Timing chain bright link (arrowed) positioned over crankshaft sprocket
timing mark
21 Now engage the upper loop of the chain over the camshaft sprocket so that the timing mark is between the two bright links on the chain (see illustration).
4.21 Camshaft sprocket timing mark positioned between two bright links
(arrowed) on chain
22 Now offer the camshaft sprocket to the shaft. Adjust the position of the camshaft so that the sprocket keyway aligns with the key.
23 Push the camshaft sprocket into position.
Insert and tighten its retaining bolt with the fuel pump eccentric correctly located (see illustration).
4.23 Tightening the camshaft sprocket retaining bolt
24 Using a very thin screwdriver blade, turn the lock on the chain tensioner fully clockwise to release the slipper (see illustration).
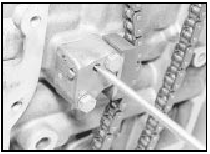
4.24 Releasing the timing chain tensioner
25 Check that the locating dowel is in position and fit the oil pump with spacer plate.
If the pump driven sprocket is hard to turn, release the pump mounting bolts and turn the pump slightly on its locating dowel.
Re-tighten the bolts.
26 Fit the oil pump drivegear to the crankshaft.
27 Bolt on the timing chain cover using a new gasket. The bolt nearest the coolant pump pulley must be located in the cover before offering it up, otherwise the pulley will prevent the bolt entering its cover hole (see illustration).
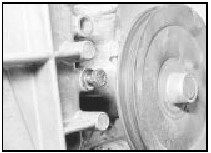
4.27 Timing cover bolt next to coolant pump pulley in place prior to fitting
cover
Do not tighten the cover bolts until the crankshaft pulley has been pushed into place to centralise the cover. Fit the coolant hose safety rod under its cover bolts. This rod prevents the coolant hose being cut by the rim of the coolant pump pulley should the hose sag.
28 Fit the fuel pump operating rod and fuel pump with reference to Chapter 4A, if necessary.
29 Tighten the timing chain cover bolts to the specified torque and then trim the upper ends of the gasket flush. Fit the rocker cover using a new gasket. Do not overtighten the securing bolts.
30 Tighten the crankshaft pulley nut to the specified torque, again jamming the flywheel to prevent the crankshaft rotating.
31 Refit the starter, if removed (Chapter 5A).
32 Refit and tension the auxiliary drivebelt (Chapter 1).
33 Lower the engine, reconnect the mounting.


