


Peugeot 205 Manual
Coolant renewal (Every 2 years (regardless of mileage))Routine maintenance and servicing / Coolant renewal (Every 2 years (regardless of mileage))
Cooling system draining
Warning: Wait until the engine is
cold before starting this
procedure. Do not allow
antifreeze to come in contact
with your skin, or with the painted surfaces
of the vehicle. Rinse off spills immediately
with plenty of water. Never leave antifreeze
lying around in an open container, or in a
puddle in the driveway or on the garage
floor. Children and pets are attracted by its
sweet smell, but antifreeze can be fatal if
ingested.
1 With the engine completely cold, remove the expansion tank filler cap. Turn the cap anti-clockwise until it reaches the first stop.
Wait until any pressure remaining in the system is released, then push the cap down, turn it anti-clockwise to the second stop, and lift it off.
2 Where fitted, unscrew the radiator filler cap from the top left-hand side of the radiator.
3 Position a suitable container beneath the coolant drain outlet at the lower left-hand side of the radiator.
4 Unscrew the drain plug and allow the coolant to drain into the container.
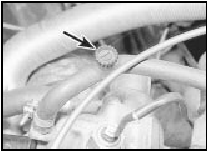
5 To assist draining, open the cooling system bleed screws. These are located in the heater matrix outlet hose union (to improve access, it may be located in an extension hose) on the engine compartment bulkhead, in the inlet manifold coolant hose (XV, XW and XU series engines) and on the top of the thermostat housing (TU series engines) (see illustrations).
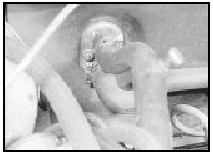
33.5a Cooling system bleed screws may be located in the heater hose . . .
33.5b . . . in the inlet manifold coolant hose . . .
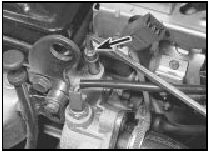
33.5c . . . or on the thermostat housing (arrowed)
6 When the flow of coolant stops, reposition the container below the cylinder block drain plug. On all engines except TU series, the drain plug is located above the right-hand driveshaft, or driveshaft intermediate bearing.
On TU series engines, the drain plug is located at the front left-hand side of the cylinder block.
7 Remove the drain plug, and allow the coolant to drain into the container.
8 If the coolant has been drained for a reason other than renewal, then provided it is clean and less than two years old, it can be re-used, though this is not recommended.
9 Refit the radiator and cylinder block drain plugs on completion of draining.
Cooling system flushing
10 If coolant renewal has been neglected, or
if the antifreeze mixture has become diluted,
then in time, the cooling system may gradually
lose efficiency, as the coolant passages
become restricted due to rust, scale deposits,
and other sediment. The cooling system
efficiency can be restored by flushing the
system clean.
11 The radiator should be flushed independently of the engine, to avoid unnecessary contamination.
Radiator flushing
12 To flush the radiator, first tighten the
radiator drain plug.
13 Disconnect the top and bottom hoses and any other relevant hoses from the radiator, with reference to Chapter 3.
14 Insert a garden hose into the radiator top inlet. Direct a flow of clean water through the radiator, and continue flushing until clean water emerges from the radiator bottom outlet.
15 If after a reasonable period, the water still does not run clear, the radiator can be flushed with a good proprietary cleaning agent. It is important that their manufacturer’s instructions are followed carefully. If the contamination is particularly bad, insert the hose in the radiator bottom outlet, and reverse-flush the radiator.
Engine flushing
16 To flush the engine, first refit the cylinder
block drain plug, and tighten the cooling
system bleed screws.
17 Remove the thermostat as described in Chapter 3, then temporarily refit the thermostat cover.
18 With the top and bottom hoses disconnected from the radiator, insert a garden hose into the radiator top hose. Direct a clean flow of water through the engine, and continue flushing until clean water emerges from the radiator bottom hose.
19 On completion of flushing, refit the thermostat and reconnect the hoses with reference to Chapter 3.
Cooling system filling
20 Before attempting to fill the cooling
system, make sure that all hoses and clips are
in good condition, and that the clips are tight.
Note that an antifreeze mixture must be used all year round, to prevent corrosion of the engine components (see following sub- Section). Also check that the radiator and cylinder block drain plugs are in place and tight.
21 Remove the expansion tank filler cap.
22 Open all the cooling system bleed screws (see paragraph 4).
23 Some of the cooling system hoses are positioned at a higher level than the top of the radiator expansion tank. It is therefore necessary to use a “header tank” when refilling the cooling system, to reduce the possibility of air being trapped in the system.
Although Peugeot dealers use a special header tank, the same effect can be achieved by using a suitable bottle, with a seal between the bottle and the expansion tank. On some engines, the expansion bottle/tank can be simply released from its normal location, raised as high as possible and tied to the bonnet to form the “header” tank.
24 Fit the “header tank” to the expansion tank and slowly fill the system. Where the radiator incorporates a filler cap, fill the radiator first until it is overflowing, and refit the filler cap (see illustration).
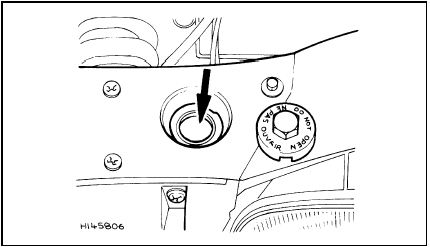
33.24 Fill the radiator through the filler (arrowed) on the left-hand side
Now, on all models, slowly fill the “header” tank. Coolant will emerge from each of the bleed screws in turn, starting with the lowest screw. As soon as coolant free from air bubbles emerges from the lowest screw, tighten that screw, and watch the next bleed screw in the system.
Repeat the procedure until the coolant is emerging from the highest bleed screw in the cooling system and all bleed screws are securely tightened.
25 If a separate bottle is being used as the “header tank”, ensure it is full (at least 0.5 litres of coolant). If the vehicle expansion bottle/tank is being used as the “header” tank, ensure it is filled to the “MAX” markings (see illustration).
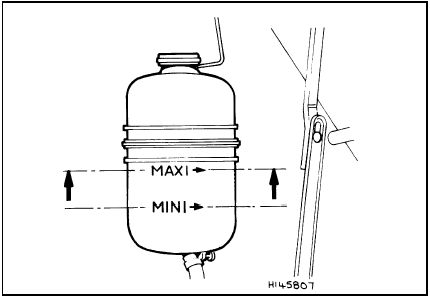
33.25 Where possible, lift out the expansion bottle, suspend it from the
bonnet to form a “header” tank and fill to the “MAX” mark
Start the engine, and run it at a fast idle speed (do not exceed 2000 rpm) until the cooling fan cuts in, and then cuts out.
During this time, squeeze the top and bottom radiator hoses to allow any trapped air to rise.
Slacken and retighten the bleed screws to allow any air that has risen to escape. Note: Take great care not to scald yourself with the hot coolant during this operation.
26 Stop the engine and allow it engine to cool, then remove the “header tank” or refit the expansion bottle/tank to its original location.
27 When the engine has cooled, check the coolant level with reference to Section 3 of this Chapter. Top-up the level if necessary, and refit the expansion tank cap.
Note: If, after draining and refilling the system, symptoms of overheating are found which did not occur previously, then the fault is almost certainly due to trapped air at some point in the system, causing an air-lock and restricting the flow of coolant; usually, the air is trapped because the system was refilled too quickly. In some cases, air-locks can be released by tapping or squeezing the various hoses. If the problem persists, stop the engine and allow it to cool down completely, before unscrewing the expansion tank filler cap, slackening the bleed screws, or disconnecting hoses to bleed out the trapped air.
Antifreeze mixture
28 The antifreeze should always be renewed
at the specified intervals. This is necessary
not only to maintain the antifreeze properties,
but also to prevent corrosion which would
otherwise occur as the corrosion inhibitors
become progressively less effective.
29 Always use an ethylene-glycol based antifreeze which is suitable for use in mixedmetal cooling systems. The quantity of antifreeze and levels of protection are indicated in the Specifications.
30 Before adding antifreeze, the cooling system should be completely drained, preferably flushed, and all hoses checked for condition and security.
31 After filling with antifreeze, a label should be attached to the expansion tank, stating the type and concentration of antifreeze used, and the date installed. Any subsequent topping-up should be made with the same type and concentration of antifreeze.
32 Do not use engine antifreeze in the windscreen/tailgate washer system, as it will cause damage to the vehicle paintwork. A screenwash additive should be added to the washer system in the quantities stated by the makers.


