


Peugeot 205 Manual
Rear brake pads (1.9 GTI models) - renewalBraking system / Rear brake pads (1.9 GTI models) - renewal
Warning: Disc brake pads must be renewed on both rear wheels at the same time - never renew the pads on only one wheel as uneven braking may result. Dust created by wear of the pads may contain asbestos, which is a health hazard. Never blow it out with compressed air and do not inhale any of it. DO NOT use petroleum-based solvents to clean brake parts. Use brake cleaner or methylated spirit only. DO NOT allow any brake fluid, oil or grease to contact the brake pads or disc. Also refer to the warning at the start of Section 2 concerning the dangers of hydraulic fluid.
1 Chock the front wheels then jack up the rear of the car and support it on axle stands (see “Jacking and vehicle support”). Remove the rear roadwheels and ensure that the handbrake is released.
2 Extract the spring clip (see illustration) and slide out the locking key retaining the bottom of the pads.
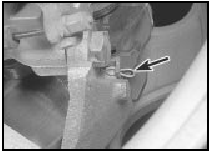
6.2 Brake pad locking key spring clip (arrowed)
3 Withdraw the brake pads using pliers, while pressing down on the upper locating ears (see illustration).
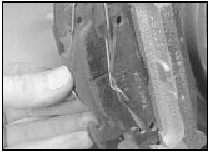
6.3 Removing the rear brake pads
4 Clean away all dust and dirt. Check for brake fluid leakage around the piston dust seal, and if evident, overhaul the caliper using the basic procedure described in Section 7.
Check the brake disc for wear, and also check that the rubber bellows on the guides are in good condition.
5 The automatic handbrake adjustment must now be retracted, in order to accommodate the new disc pads. To do this, turn the piston using a screwdriver in the grooves (see illustration),
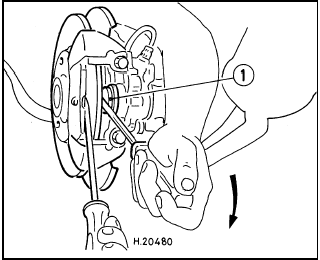
6.5 Turning the caliper piston to retract the automatic handbrake adjuster
1 Piston
at the same time using a second screwdriver to apply an outward force to the caliper. Do not damage the brake disc while carrying out this procedure.
6 Set the piston so that the mark is horizontal, and either above or below the piston groove (see illustration).
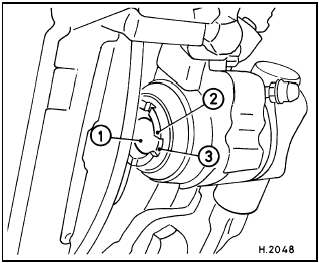
6.6 Correct final position of caliper piston
1 Piston
2 Mark
3 Groove
7 Apply a little anti-squeal brake grease to the pad contact areas on the caliper.
8 Locate the two brake pads in the caliper, pressing the upper ears fully into position.
9 Slide the locking key into the caliper, and secure with the spring clip.
10 Fully depress the brake pedal several times to set the automatic adjuster and position the brake pads in their normal position.
11 Repeat the operations on the opposite disc caliper.
12 Check the fluid level in the master cylinder reservoir, and top-up if necessary.
13 Refit the roadwheels and lower the car to the ground.


