


Peugeot 205 Manual
Hydraulic system - bleedingBraking system / Hydraulic system - bleeding
Warning: Hydraulic fluid is
poisonous; wash off immediately
and thoroughly in the case of
skin contact, and seek
immediate medical advice if any fluid is
swallowed or gets into the eyes. Certain
types of hydraulic fluid are inflammable,
and may ignite when allowed into contact
with hot components; when servicing any
hydraulic system, it is safest to assume that
the fluid IS inflammable, and to take
precautions against the risk of fire as
though it is petrol that is being handled.
Hydraulic fluid is also an effective paint stripper, and will attack plastics; if any is spilt, it should be washed off immediately, using copious quantities of clean water.
Finally, it is hygroscopic (it absorbs moisture from the air). The more moisture is absorbed by the fluid, the lower its boiling point becomes, leading to a dangerous loss of braking under hard use.
Old fluid may be contaminated and unfit for further use. When topping-up or renewing the fluid, always use the recommended type, and ensure that it comes from a freshly-opened sealed container.
General
1 The correct functioning of the brake
hydraulic system is only possible after
removing all air from the components and
circuit; this is achieved by bleeding the
system.
2 During the bleeding procedure, add only clean, fresh hydraulic fluid of the specified type; never re-use fluid that has already been bled from the system. Ensure that sufficient fluid is available before starting work.
3 If there is any possibility of incorrect fluid being used in the system, the brake lines and components must be completely flushed with uncontaminated fluid and new seals fitted to the components.
4 If brake fluid has been lost from the master cylinder due to a leak in the system, ensure that the cause is traced and rectified before proceeding further.
5 Park the car on level ground, switch off the ignition and select first gear (manual transmission) or Park (automatic transmission) then chock the wheels and release the handbrake.
6 Check that all pipes and hoses are secure, unions tight, and bleed screws closed.
Remove the dust caps and clean any dirt from around the bleed screws.
7 Unscrew the master cylinder reservoir cap, and top-up the reservoir to the “MAX” level line. Refit the cap loosely, and remember to maintain the fluid level at least above the “MIN” level line throughout the procedure, otherwise there is a risk of further air entering the system.
8 There are a number of one-man, do-ityourself, brake bleeding kits currently available from motor accessory shops. It is recommended that one of these kits is used wherever possible, as they greatly simplify the bleeding operation, and also reduce the risk of expelled air and fluid being drawn back into the system. If such a kit is not available, the basic (two-man) method must be used, which is described in detail below.
9 If a kit is to be used, prepare the car as described previously, and follow the kit manufacturer’s instructions, as the procedure may vary slightly according to the type being used; generally, they are as outlined below in the relevant sub-section.
10 Whichever method is used, the same sequence must be followed (paragraphs 11 and 12) to ensure the removal of all air from the system.
Bleeding sequence
11 If the hydraulic system has only been
partially disconnected and suitable precautions
were taken to minimise fluid loss, it should only
be necessary to bleed that part of the system
(ie the primary or secondary circuit).
12 If the complete system is to be bled, then
it should be done in the following sequence:
Non-ABS models:
Diagonally split system - all models except 1.6
GTI:
RH rear wheel
LH front wheel
LH rear wheel
RH front wheel
Front-to-rear split system - 1.6 GTI models:
LH rear wheel and inertia compensator
RH rear wheel
LH front wheel
RH front wheel
ABS models:
Note: Before carrying out any bleeding, the
battery negative lead must be disconnected,
and the brown three-way, brown five-way and
green five-way wiring connectors must be
disconnected from the regulator unit to
prevent the possibility of air entering the
system. The connectors must not be
reconnected until the hydraulic system has
been bled.
LH rear wheel
RH rear wheel
LH front wheel
RH front wheel
ABS regulator unit (see illustration)

2.12 Bleed screws (1 and 2) on ABS regulator unit
Bleeding - basic (two-man)
method
13 Collect a clean glass jar of reasonable size
and a suitable length of plastic or rubber
tubing, which is a tight fit over the bleed
screw, and a ring spanner to fit the screws.
The help of an assistant will also be required.
14 If not already done, remove the dust cap from the bleed screw of the first wheel to be bled and fit the spanner and bleed tube to the screw (see illustration).
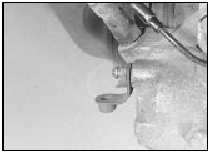
2.14 Bleed screw and dust cap on front brake caliper
Place the other end
of the tube in the jar, and pour in sufficient
fluid to cover the end of the tube.
15 Ensure that the master cylinder reservoir fluid level is maintained at least above the “MIN” level line throughout the procedure.
16 Have the assistant fully depress the brake pedal several times to build up pressure, then maintain it on the final downstroke.
17 While pedal pressure is maintained, unscrew the bleed screw (approximately one turn) and allow the compressed fluid and air to flow into the jar. The assistant should maintain pedal pressure, following it down to the floor if necessary, and should not release it until instructed to do so. When the flow stops, tighten the bleed screw again have the assistant release the pedal slowly, and recheck the reservoir fluid level.
18 Repeat the steps given in paragraphs 16 and 17 until the fluid emerging from the bleed screw is free from air bubbles. If the master cylinder has been drained and refilled, and air is being bled from the first screw in the sequence, allow approximately five seconds between cycles for the master cylinder passages to refill.
19 On 1.6 GTI models only it is now important to dislodge air trapped in the inertia compensator. To do this, open the bleed screw again and have your assistant fully depress and release the brake pedal rapidly 4 or 5 times, finally keeping the pedal depressed before tightening the bleed screw.
20 When no more air bubbles appear, tighten the bleed screw securely, remove the tube and spanner and refit the dust cap. Do not overtighten the bleed screw.
21 Repeat these procedures on the remaining brakes in sequence until all air is removed from the system and the brake pedal feels firm again.
Bleeding - using a one-way
valve kit
22 As their name implies, these kits consist of
a length of tubing with a one-way valve fitted,
to prevent expelled air and fluid being drawn
back into the system; some kits include a
translucent container, which can be positioned
so that the air bubbles can be more easily
seen flowing from the end of the tube.
23 The kit is connected to the bleed screw, which is then opened. The user returns to the driver’s seat, depresses the brake pedal with a smooth steady stroke, and slowly releases it; this is repeated until the expelled fluid is clear of air bubbles. When using one of these kits on 1.6 GTI models, remember to carry out the procedure described in paragraph 19 after bleeding the first brake in the sequence.
24 Note that these kits simplify work so much that it is easy to forget the master cylinder fluid level; ensure that this is maintained at least above the “MIN” level line at all times.
Bleeding - using a pressurebleeding
kit
25 These kits are usually operated by the
reserve of pressurised air contained in the
spare tyre. However, note that it will probably
be necessary to reduce the pressure to a
lower level than normal; refer to the
instructions supplied with the kit.
26 By connecting a pressurised, fluid-filled container to the master cylinder reservoir, bleeding is then carried out by simply opening each bleed screw in turn (in the specified sequence) and allowing the fluid to run out, until no more air bubbles can be seen in the expelled fluid. When using one of these kits on 1.6 GTI models, remember to carry out the procedure described in paragraph 19 after bleeding the first brake in the sequence.
27 This method has the advantage that the large reservoir of fluid provides an additional safeguard against air being drawn into the system during bleeding.
28 Pressure bleeding is particularly effective when bleeding “difficult” systems, or when bleeding the complete system at the time of routine fluid renewal.
All methods
29 When bleeding is complete, and firm
pedal feel is restored, wash off any spilt fluid,
tighten the bleed screws securely, and refit
their dust caps.
30 Check the hydraulic fluid level in the master cylinder reservoir and top-up if necessary.
31 Discard any hydraulic fluid that has been bled from the system; it will not be fit for re-use.
32 Check the feel of the brake pedal. If it feels at all spongy, air must still be present in the system, and further bleeding is required.
Failure to bleed satisfactorily after a reasonable repetition of the bleeding operations may be due to worn master cylinder seals.
33 On models with ABS, reconnect the wiring connectors to the regulator unit and reconnect the battery.


