


Peugeot 205 Manual
Carburettor - fault diagnosis, overhaul and adjustmentsFuel system - carburettor engines / Carburettor - fault diagnosis, overhaul and adjustments
Fault diagnosis
1 If a carburettor fault is suspected, always
check first that the ignition timing is correctly
set, that the spark plugs are in good condition
and correctly gapped, that the throttle and
choke cables are correctly adjusted, and that
the air cleaner filter element is clean; refer to
the relevant Sections of Chapter 1, Chapter 5
or this Chapter. If the engine is running very
roughly, first check the valve clearances as
described in Chapter 1, then check the
compression pressures as described in
Chapter 2.
2 If careful checking of all the above produces no improvement, the carburettor must be removed for cleaning and overhaul.
3 Prior to overhaul, check the availability of component parts before starting work; note that most sealing washers, screws and gaskets are available in kits, as are some of the major sub-assemblies. In most cases, it will be sufficient to dismantle the carburettor and to clean the jets and passages.
Overhaul
Note: Refer to the warning note in Section 1
before proceeding. The following procedures
are typical for the various carburettors
encountered on 205 models. Refer to the
accompanying illustrations for details of
specific carburettor types and component
locations.
4 Remove the carburettor from the car as described in Section 9.
5 Unscrew the idle cut-off solenoid (where fitted) from the carburettor body, and remove it along with its plunger and spring. To test the solenoid, connect a 12-volt battery to it (positive terminal to the solenoid terminal, negative terminal to the solenoid body), and check that the plunger is retracted fully into the body. Disconnect the battery, and check that the plunger is pushed out by spring pressure. If the valve does not perform as expected, and cleaning does not improve the situation, the solenoid valve must be renewed.
6 Remove the screws and lift off the carburettor upper body.
7 Tap out the float pivot pin and remove the float assembly, needle valve, and float chamber gasket. Check that the needle valve anti-vibration ball is free in the valve end, then examine the needle valve tip and seat for wear or damage. Examine the float assembly and pivot pin for signs of wear and damage. The float assembly must be renewed if it appears to be leaking - shake the float to detect the presence of fuel inside.
8 Unscrew the fuel inlet union and inspect the fuel filter. Clean the filter housing of debris and dirt, and renew the filter if it is blocked.
9 Undo the screws and remove the various diaphragm covers and diaphragms. Remove the diaphragm(s) and spring(s), noting which way around all the parts are fitted. Examine the diaphragm(s) for signs of damage and deterioration, and renew if necessary.
10 Unscrew the jets from the upper body and main body making notes as to their location and arrangement.
11 Remove the idle mixture adjustment screw tamperproof cap if fitted. Screw the screw in until it seats lightly, counting the exact number of turns required to do this, then unscrew it. On refitting, screw the screw in until it seats lightly, then back the screw off by the number of turns noted on removal, to return the screw to its original position.
12 Clean the jets, carburettor body assemblies, float chamber and internal drillings. An air line may be used to clear the internal passages once the carburettor is fully dismantled.
Caution: If high pressure air is directed into drillings and passages where a diaphragm is fitted, the diaphragm is likely to be damaged.
13 Use a straight edge to check all carburettor body assembly mating surfaces for distortion.
14 On reassembly renew any worn components and fit a complete set of new gaskets and seals. A jet kit and a gasket and seal kit are available from your Peugeot dealer.
15 Reassembly is a reversal of the dismantling procedure. Ensure that all jets are securely locked in position, but take great care not to overtighten them. Ensure that all mating surfaces are clean and dry, and that all body sections are correctly assembled with their fuel and air passages correctly aligned. Prior to refitting the carburettor to the car, carry out all the applicable adjustments, according to carburettor type as described below.
Solex 32 and 34 PBISA
adjustments
Idle speed and mixture
16 Refer to Chapter 1.
Fast idle setting
17 To adjust this accurately it will be
necessary to measure the angular movement
of the throttle valve. The use of a piece of card
with the angle drawn on it will provide the
necessary setting.
18 Fully close the choke valve then check that the throttle valve has opened by 20° 40’ ± 30’.
19 If necessary turn the fast idle adjustment screw as required.
Solex 35 PBISA 8 adjustments
Idle speed and mixture
20 Refer to Chapter 1.
Initial throttle opening 21 To adjust the initial throttle valve opening, fully unscrew the adjustment screw then, using a piece of card as described in paragraph 17, turn the screw until the valve is opened by 7° 45’.
Fast idle setting
22 The fast idle setting is only made on the
left-hand carburettor with the reference
number 346. First close the choke valve then
check that the throttle valve has opened by
15є. If not, turn the adjustment screw as
required.
Choke opening after starting 23 To adjust the choke opening after starting, first close the choke then pull the vacuum opener rod and, using a suitable twist drill, check that the gap between the bottom edge of the throttle valve and the carburettor wall is 2.5 ± 0.3 mm. If not, turn the nut on the end of the vacuum opener as required.
Solex 32 PBISA 16 adjustments
Idle speed and mixture
24 Refer to Chapter 1.
Fast idle setting
25 With the carburettor removed, invert it
then pull the choke lever fully on.
26 Using a twist drill, check that the gap between the throttle valve and barrel is 0.8 mm. If not, turn the adjustment screw.
Choke opening after starting 27 Close the choke flap, then fully operate the pneumatic opener either manually or by vacuum.
28 Using a twist drill, check that the gap between the choke flap and barrel is 3.0 mm.
If not, turn the adjusting screw in the end of the opener.
Throttle damper
29 Certain models may have a throttle
damper assembly, fitted to the carburettor on
a modified throttle cable support bracket, to
prevent engine stalling during gearchanges.
30 The assembly should not require any adjustment, but if the throttle is held open by the damper excessively during gearchanges, adjustment can be made by loosening the locknut, and altering the position of the damper in the bracket as necessary. Tighten the locknut on completion of adjustment.
Solex 32-34 Z2 adjustments
Idle speed and mixture
31 Refer to Chapter 1.
Additional adjustments
32 At the time of writing, not further
information was available relating to any
further adjustment of these carburettors.
Weber 35 IBSH adjustments
Idle speed and mixture
33 Refer to Chapter 1.
Float level
34 Hold the cover vertical with the float arm
touching, but not depressing, the
spring-tensioned ball on the needle valve.
35 Using vernier calipers, measure the dimension between the float and the fitted gasket (see illustration).
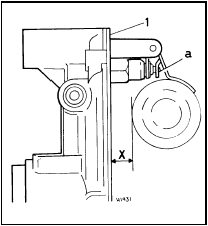
10.35 Checking float level dimension “X” on the Weber 35 IBSH carburettor
1 Gasket
a Adjustment tongue
If it is not 9.0 mm, bend the tongue on the arm as necessary.
Throttle normal idling position 36 This adjustment is made after overhauling the carburettors, and is necessary to enable the engine to be started and to prevent the throttle valve sticking in the closed position.
The idle speed screw must be adjusted to set the throttle valve 6° open, using a piece of card as described in paragraph 17.
Fast idle setting
37 With the choke fully closed, the throttle
valve should be open by 14°. Adjust the fast
idle screw on the throttle lever to achieve the
desired setting (see illustration).
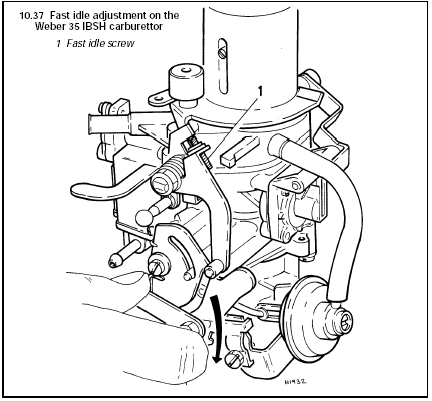
10.37 Fast idle adjustment on the Weber 35 IBSH carburettor
1 Fast idle screw
Choke opening setting 38 This adjustment can be made with the carburettor removed using a vacuum pump, or with the carburettor fitted and the engine running.
39 Turn the choke lever so that the choke is fully closed (see illustration).
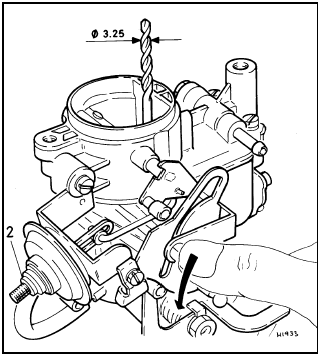
10.39 Checking the choke opening setting on the Weber 35 IBSH carburettor
2 Adjustment screw on vacuum capsule
40 With the engine running or vacuum applied, check that the gap between the lower edge of the choke valve and the barrel is 3.25 mm. Use a twist drill to make the check, and if adjustment is necessary, turn the screw located in the end of the vacuum capsule.
Weber 36 TLC adjustments
Idle speed and mixture
41 Refer to Chapter 1.
Float level
42 To check the float level, hold the cover
vertically with the gasket in place. Check that
the dimension is as specified (see
illustration),
10.42 Float level setting on the Weber 36 TLC carburettor
1 Gasket
x = 28.0 mm
and if necessary bend the tongue on the float arm to correct it.
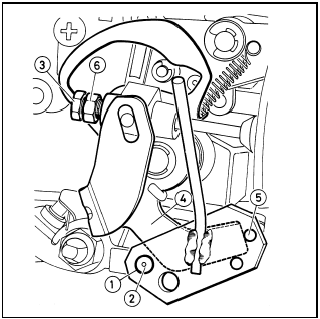
Choke opening after starting 43 To adjust the cold start device choke opening after starting, Peugeot tool No 0.145G is essential. The carburettor must be fitted and the engine must be at normal operating temperature and idling at the specified idle speed (the cooling fan should have cut in and out at least twice). The air cleaner hose and the cold start device cover must be removed, and the transmission selector lever should be in the Park (P) position.
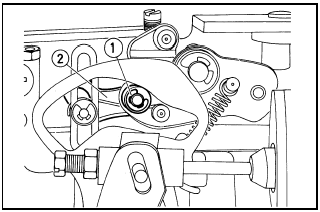
44 Fit the tool, then slacken the locknut and turn the adjusting screw to bring the end of the cam just into contact with the peg on the tool (see illustration).
10.44 Choke opening after starting adjustment on the Weber 36 TLC carburettor
1 Locknut
2 Hole
3 Roller
4 Adjusting screw
5 Can
6 Peg on special tool
45 Using a 9.5 mm twist drill, check that the choke flap has opened by 9.5 mm - if not, adjust by means of the adjusting screw (see illustration).
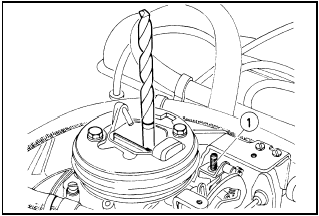
10.45 Choke opening after starting adjusting screw (1) on the Weber 36 TLC
carburettor
46 Disconnect and plug the diaphragm vacuum hose, and using a 5.5 mm twist drill, check that the choke flap has opened by 5.5 mm if not, loosen the clamp screw then hold the roller against the top of the cam, and adjust the lever until the drill will just pass (see illustration). Tighten the screw and reconnect the hose on completion.
10.46 Choke opening after starting adjustment on the Weber 36 TLC carburettor
1 Roller
2 Lever
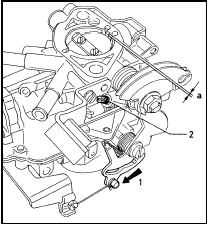
Positive throttle opening 47 With the choke opening after starting adjusted as described previously, press the roller to open the choke flap and check that the engine speed is 2000 rpm with the cooling fan stopped. If necessary, adjust the screw to obtain the specified speed (see illustration).
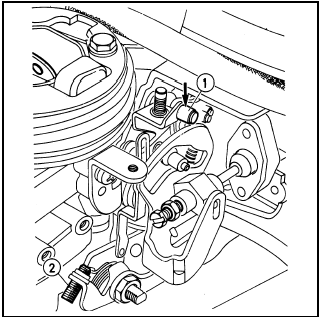
10.47 Positive throttle opening adjustment on the Weber 36 TLC carburettor
1 Roller
2 Adjusting screw
48 To adjust the choke cam, Peugeot tool No 0.145G must again be used. Fit the tool, loosen the locknut, and adjust the screw until the cam contacts peg (see illustration).
10.48 Choke cam adjustment on the Weber 36 TLC carburettor
1 Hole
2 Roller
3 Adjusting screw
4 Cam
5 Peg on special tool
6 Locknut
Tighten the locknut on completion.
49 With the adjustments completed, stop the engine and refit the cold start device cover and the air cleaner hose.
Weber 32 IBS 15, 32 IBSH 16/17
and 34 TLP 3 adjustments
Idle speed and mixture
50 Refer to Chapter 1.
Fast idle setting
51 With the carburettor removed, invert it
then pull the choke lever fully on.
52 Using a twist drill, check that the gap between the throttle valve and barrel is 0.8 mm. If not, turn the adjustment screw (see illustration).
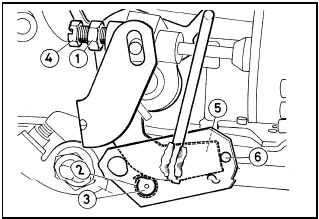
10.52 Fast idle adjustment on Weber IBS, IBSH and TLP carburettors
1 Choke lever fully on
2 Adjustment screw
a = 0.8 mm
Throttle damper
53 Refer to the procedures contained in
paragraphs 29 and 30
Additional adjustments
54 At the time of writing, not further
information was available relating to any
further adjustment of these carburettors.


