


Peugeot 205 Manual
Piston rings - refittingEngine removal and overhaul procedures / Piston rings - refitting
1 Before fitting new piston rings, the ring end gaps must be checked as follows.
2 Lay out the piston/connecting rod assemblies and the new piston ring sets, so that the ring sets will be matched with the same piston and cylinder during the end gap measurement and subsequent engine reassembly.
3 Insert the top ring into the first cylinder, and push it down the bore using the top of the piston. This will ensure that the ring remains square with the cylinder walls. Position the ring near the bottom of the cylinder bore, at the lower limit of ring travel. Note that the top and second compression rings are different.
The second ring is easily identified by the step on its lower surface, and by the fact that its outer face is tapered.
4 Measure the end gap using feeler blades.
5 Repeat the procedure with the ring at the top of the cylinder bore, at the upper limit of its travel (see illustration), and compare the measurements with the figures given in the Specifications. Where no figures are given, seek the advice of a Peugeot dealer or engine reconditioning specialist.
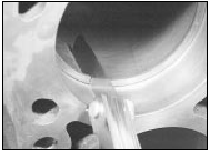
12.5 Measuring piston ring end gap
6 If the gap is too small (unlikely if genuine Peugeot parts are used), it must be enlarged, or the ring ends may contact each other during engine operation, causing serious damage.
Ideally, new piston rings providing the correct end gap should be fitted. As a last resort, the end gap can be increased by filing the ring ends very carefully with a fine file. Mount the file in a vice equipped with soft jaws, slip the ring over the file with the ends contacting the file face, and slowly move the ring to remove material from the ends. Take care, as piston rings are sharp, and are easily broken.
7 With new piston rings, it is unlikely that the end gap will be too large. If the gaps are too large, check that you have the correct rings for your engine and for the particular cylinder bore size.
8 Repeat the checking procedure for each ring in the first cylinder, and then for the rings in the remaining cylinders. Remember to keep rings, pistons and cylinders matched up.
9 Once the ring end gaps have been checked and if necessary corrected, the rings can be fitted to the pistons.
10 Fit the piston rings using the same technique as for removal. Fit the bottom (oil control) ring first, and work up. When fitting a three piece oil control ring, first insert the expander and position its gap in line with the centre of the gudgeon pin. Fit the scraper rings with their gaps positioned 20 to 30 mm either side of the expander gap. Where the oil control scraper is of one-piece type, position its gap 180° from the expander gap. Ensure that the second compression ring is fitted the correct way up, with its identification mark (either a dot of paint or the word “TOP” or “TOPC” stamped on the ring surface) at the top, and the stepped surface at the bottom (see illustration).
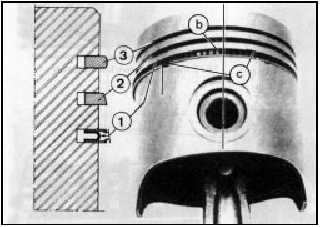
12.10 Piston ring identification
1 Oil control ring
2 Second compression ring
3 First compression ring
b Oil control expander ring gap
c Oil control scraper ring gaps
Arrange the gaps of the top and second compression rings 120° either side of the oil control expander gap. Note: Always follow any instructions supplied with the new piston ring sets - different manufacturers may specify different procedures. Do not mix up the top and second compression rings, as they have different cross-sections.


