


Peugeot 205 Manual
Sump - removal and refittingXU series engine in-car repair procedures / Sump - removal and refitting
Removal
1 Disconnect the battery negative lead.
2 Drain the engine oil, then clean and refit the engine oil drain plug, tightening it securely. If the engine is nearing its service interval when the oil and filter are due for renewal, it is recommended that the filter is also removed, and a new one fitted. After reassembly, the engine can then be refilled with fresh oil. Refer to Chapter 1 for further information.
3 Chock the rear wheels then jack up the front of the car and support it on axle stands (see “Jacking and vehicle support”).
4 On models with air conditioning, where the compressor is mounted onto the side of the sump, remove the drivebelt as described in Chapter 1. Unbolt the compressor, and position it clear of the sump. Support the weight of the compressor by tying it to the vehicle, to prevent any excess strain being placed on the compressor lines. Do not disconnect the refrigerant lines from the compressor (refer to the warnings given in Chapter 3).
5 Disconnect the wiring to the oil level sensor and the hose to the crankcase ventilation system suction drain pipe on models so equipped.
6 Progressively slacken and remove all the sump retaining bolts. Since the sump bolts vary in length and type, remove each bolt in turn, and store it in its correct fitted order by pushing it through a clearly-marked cardboard template. This will avoid the possibility of installing the bolts in the wrong locations on refitting.
7 Break the joint by striking the sump with the palm of your hand. Lower the sump, and withdraw it from underneath the vehicle.
Remove the gasket (where fitted), and discard it; a new one must be used on refitting. While the sump is removed, take the opportunity to check the oil pump pick-up/strainer for signs of clogging or splitting. If necessary, remove the pump as described in Section 10, and clean or renew the strainer.
8 On some models, a large spacer plate is fitted between the sump and the base of the cylinder block/crankcase (see illustration).
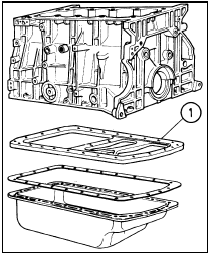
9.8 Sump spacer plate (1) fitted to certain models
If this plate is fitted, undo the two retaining screws from diagonally-opposite corners of the plate. Remove the plate from the base of the engine, noting which way round it is fitted.
Refitting
9 Clean all traces of sealant/gasket from the
mating surfaces of the cylinder
block/crankcase and sump, then use a clean
rag to wipe out the sump and the engine’s
interior.
10 Where a spacer plate is fitted, remove all traces of sealant/gasket from the spacer plate, then apply a thin coating of silicone sealant to the plate upper mating surface.
Offer up the plate to the base of the cylinder block/crankcase, and securely tighten its retaining screws (see illustration).
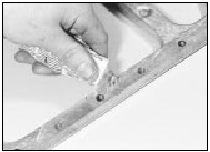
9.10 Applying sealant to the sump spacer plate upper surface
11 On models where the sump was fitted without a gasket, ensure that the sump mating surfaces are clean and dry, then apply a thin coating of suitable sealant to the sump mating surface.
12 On models where the sump was fitted with a gasket, ensure that all traces of the old gasket have been removed, and that the sump mating surfaces are clean and dry.
Position the new gasket on the top of the sump, using a dab of grease to hold it in position.
13 Offer up the sump to the cylinder block/crankcase. Refit its retaining bolts, ensuring that each is screwed into its original location. Tighten the bolts evenly and progressively to the specified torque setting.
14 Where necessary, align the air conditioning compressor with its mountings on the sump, and insert the retaining bolts.
Securely tighten the compressor retaining bolts, then refit the drivebelt as described in Chapter 1.
15 Reconnect the wiring connector to the oil level sensor (where fitted).
16 Lower the vehicle to the ground, then refill the engine with oil as described in Chapter 1.


