


Peugeot 205 Manual
Idle speed and mixture check and adjustment (Every 24000 miles (36000 km) or
2 years)Routine maintenance and servicing / Idle speed and mixture check and adjustment (Every 24000 miles (36000 km) or
2 years)
1 Before checking the idle speed and mixture setting, always check the following first: a) Check the ignition timing (Chapter 5B).
b) Check that the spark plugs are in good condition and correctly gapped (Section 7).
c) Check that the throttle cable and, on carburettor models, the choke cable (where fitted) is correctly adjusted (Section 8 and Chapter 4A, 4B or 4C).
d) Check that the crankcase breather hoses are secure, with no leaks or kinks (Section 29).
e) Check that the air cleaner filter element is clean (Section 26).
f) Check that the exhaust system is in good condition (Chapter 4D).
g) If the engine is running very roughly, check the compression pressures and valve clearances as described in Chapter 2A, 2B or 2C.
2 Take the car on a journey of sufficient length to warm it up to normal operating temperature. Proceed as described under the relevant sub-heading. Note: Adjustment should be completed within two minutes of return, without stopping the engine. If this cannot be achieved, or if the radiator electric cooling fan operates, first wait for the cooling fan to stop. Clear any excess fuel from the inlet manifold by racing the engine two or three times to between 2000 and 3000 rpm, then allow it to idle again.
Carburettor models
Idle speed adjustment - single
carburettor engines
3 Ensure that all electrical loads are switched
off and, where applicable, the choke is
pushed fully in; if the car does not have a
tachometer (rev counter), connect one to the
engine, following its manufacturer’s
instructions. Note the idle speed, and
compare it with that specified.
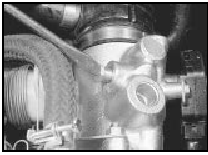
4 The idle speed adjusting screw is situated in various locations according to carburettor type (see illustrations).
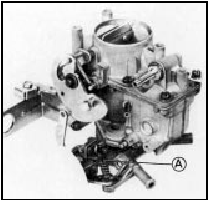
28.4a Typical idle speed adjusting screw location (A) on the Solex PBISA
carburettors
28.4b Idle speed adjusting screw (1) and mixture screw (2) location on the
Solex 32-34 Z2 carburettors
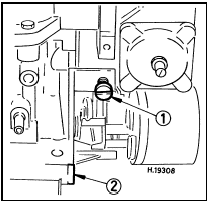
28.4c Idle speed adjusting screw location (1) on the Weber 32 IBSH
carburettors
28.4d Idle speed adjusting screw location (1) on the Weber 36 TLC
carburettors
It may be necessary
to remove a retaining clip and plastic cover to
gain access to the carburettor. Using a
suitable flat-bladed screwdriver, turn the idle
speed screw in or out as necessary to obtain
the specified idling speed as given in the
Specifications.
5 If the idle mixture CO content is not to be adjusted, switch off the engine, disconnect any instruments and refit all disturbed components.
Idle speed adjustment - twin
carburettor engines
6 On twin carburettor installations, it is
necessary to balance the carburettors so that
the airflow through both is the same before
adjusting the idling speed. To do this a
vacuum gauge or carburettor synchronising
tool will be required.
7 Ensure that all electrical loads are switched off and, where applicable, the choke is pushed fully in; if the car does not have a tachometer (rev counter), connect one to the engine, following its manufacturer’s instructions. Note the idle speed, and compare it with that specified.
8 Remove the air cleaner assembly as described in Chapter 4A.
9 If a vacuum gauge is being used, disconnect the vacuum pipe and connect the gauge to the vacuum pipe stub on the lefthand carburettor (see illustrations).
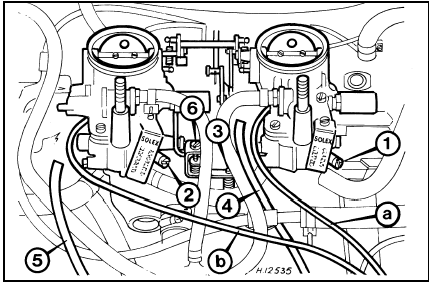
28.9a Adjustment points on the Solex twin carburettor installation
1 Mixture screw
2 Mixture screw
3 Idle speed screw
4 Vacuum pipe
5 Vacuum pipe
6 Synchronising screw
a Vacuum gauge pipe
b Vacuum gauge pipe
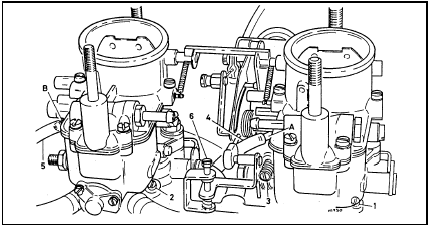
28.9b Adjustment points on the Weber twin carburettor installation
A and B Vacuum gauge pipe connections
1 Mixture screw
2 Mixture screw
3 Idle speed screw
4 Vacuum pipe
5 Vacuum pipe
6 Synchronising screw
10 With the engine idling, turn the idle speed screw on the interconnecting linkage as necessary until the engine speed is 1000 rpm.
11 Note the reading on the vacuum gage, then transfer the gauge pipe to the vacuum pipe stub on the right-hand carburettor. If the reading is not as previously recorded, turn the synchronising screw on the linkage as necessary until an identical reading is shown on the gauge.
12 Blip the throttle once or twice and check that both vacuum readings are as previously indicated.
13 Reset the idle speed by means of the idle speed screw to obtain the specified idling speed.
14 If a vacuum gauge is not available a carburettor synchronising tool available at most motor stores can be used instead.
These instruments are basically airflow meters and should show identical readings when moved from one carburettor venturi to the other. Adjust the airflow through the carburettor, by means of the synchronising screw, until both carburettors show the same reading on the tool. When correct, reset the idling speed by means of the idle speed screw to obtain the specified speed. Note that if one of these instruments is being used, it will not be necessary to disconnect the carburettor vacuum pipes.
15 If the idle mixture CO content is not to be adjusted, switch off the engine, disconnect the instruments and refit all disturbed components.
Idle mixture CO level adjustment 16 The idle mixture (exhaust gas CO level) is set at the factory, and should require no further adjustment. If, due to a change in engine characteristics (carbon build-up, bore wear etc) or after a major carburettor overhaul, the mixture setting is lost, it can be reset. Note, however, that an exhaust gas analyser (CO meter) will be required to check the mixture, in order to set it with the necessary standard of accuracy; if this is not available, the car must be taken to a Peugeot dealer for the work to be carried out.
17 If an exhaust gas analyser is available, follow its manufacturer’s instructions to check the exhaust gas CO level. If adjustment is required, it is made by turning the mixture adjustment screw as necessary. As with the idle speed screw, the mixture adjusting screw is situated in various locations according to carburettor type (see illustrations).
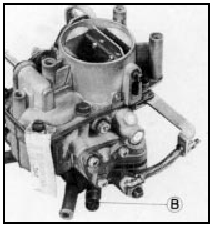
28.17a Typical idle mixture adjusting screw location (B) on the Solex PBISA
carburettors
28.17b Idle mixture adjusting screw location (2) on the Weber IBSH
carburettors
28.17c Idle mixture adjusting screw location (2) on the Weber 36 TLC
carburettors
The screw may also be covered with a tamperproof plug to prevent unnecessary adjustment. If so, use a sharp instrument to hook out the plug.
18 Using a suitable flat-bladed screwdriver, turn the mixture adjustment screw (in very small increments) until the CO level is correct.
Turning the screw in (clockwise) weakens the mixture and reduces the CO level, turning it out will richen the mixture and increase the CO level. On twin carburettor installations turn both mixture adjustment screws by equal amounts when making the adjustments.
19 When adjustments are complete, disconnect any test equipment, and fit a new tamperproof plug to the mixture adjustment screw. Recheck the idle speed and, if necessary, readjust.
Single-point fuel injection
models
20 Experienced home mechanics with a
considerable amount of skill and equipment
(including a good-quality tachometer and a
good-quality, carefully-calibrated exhaust gas
analyser) may be able to check the exhaust
CO level and the idle speed. However, if these
are found to be in need of adjustment, the car
must be taken to a suitably-equipped
Peugeot dealer, for diagnosis. On all singlepoint
fuel injection models, the idle speed and
mixture CO content is controlled by the
engine management ECU and cannot be
adjusted. If the idle speed and/or CO level is
incorrect, there is likely to be a fault in the
engine management system (see Chapter 4B).
Multi-point fuel injection models
Idle speed adjustment
21 Ensure that all electrical loads are
switched off. If the car does not have a
tachometer (rev counter), connect one to the
engine, following its manufacturer’s
instructions. Note the idle speed, and
compare it with that specified.
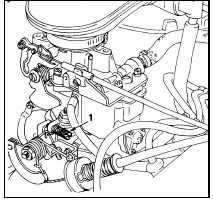
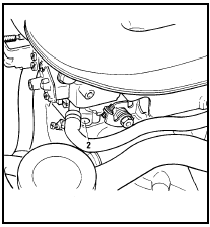
22 If adjustment is necessary, turn the air screw (LE2-Jetronic) or idle speed adjustment screw (LU2-Jetronic and Motronic M1.3) in the throttle housing to obtain the specified idling speed (see illustrations).
28.22a Idle speed air screw adjustment on the LE2-Jetronic fuel injection
system
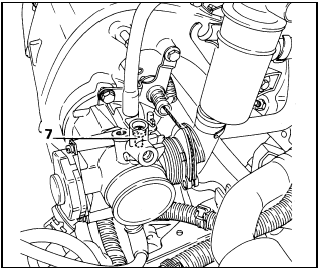
28.22b Idle speed adjustment screw (7) on the LU2-Jetronic and Motronic M1.3
fuel injection systems
If, on the LE2-
Jetronic system, the correct speed cannot be
obtained by means of the air screw, check
and adjust the throttle initial position as
described in Chapter 4C, Section 10.
Idle mixture CO level adjustment Note: Adjustment of the idle mixture CO content is only possible on the LE2-Jetronic system. On The LU2-Jetronic and Motronic M1.3 systems it is controlled by the fuel injection system ECU.
23 The idle mixture (exhaust gas CO level) is set at the factory, and should require no further adjustment. If, due to a change in engine characteristics (carbon build-up, bore wear etc) or after a major overhaul, the mixture setting is lost, it can be reset. Note, however, that an exhaust gas analyser (CO meter) will be required to check the mixture, in order to set it with the necessary standard of accuracy; if this is not available, the car must be taken to a Peugeot dealer for the work to be carried out.
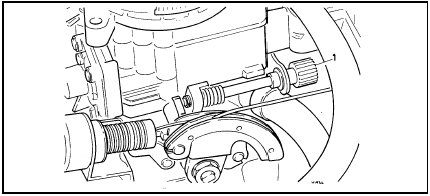
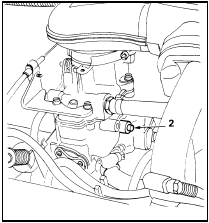
24 If an exhaust gas analyser is available, follow its manufacturer’s instructions to check the exhaust gas CO level. If adjustment is required, prise out the tamperproof cap on the airflow sensor and use an Allen key to adjust the mixture (see illustration). Turn the screw in to richen the mixture and out to weaken it.
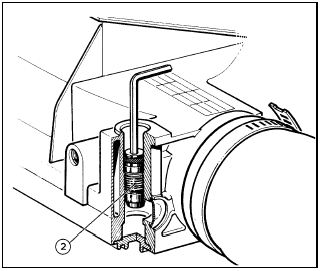
28.24 Mixture adjustment screw (2)
25 Blip the throttle two or three times and then recheck that the idle speed and mixture is correct.
26 When adjustments are complete, disconnect the test equipment, and fit a new tamperproof plug to the mixture adjustment screw.


