


Peugeot 205 Manual
Auxiliary drivebelt check and renewal (Every 12000 miles (18000 km) or 12
months)Routine maintenance and servicing / Auxiliary drivebelt check and renewal (Every 12000 miles (18000 km) or 12
months)
1 Depending on specification, either one or two auxiliary drivebelts are fitted. Where two belts are fitted, it will obviously be necessary to remove the outer belt in order to renew the inner belt.
Checking the auxiliary drivebelt
condition
2 Apply the handbrake, then jack up the front
of the car and support it on axle stands.
Remove the right-hand front roadwheel.
3 From underneath the front of the car, prise out the retaining clips, and remove the plastic cover from the wing valance where necessary, to gain access to the crankshaft sprocket/pulley bolt.
4 Using a suitable socket and extension bar fitted to the crankshaft sprocket/pulley bolt, rotate the crankshaft so that the entire length of the drivebelt(s) can be examined. Examine the drivebelt(s) for cracks, splitting, fraying or damage. Check also for signs of glazing (shiny patches) and for separation of the belt plies.
Renew the belt if worn or damaged.
5 If the condition of the belt is satisfactory, check the drivebelt tension as described below.
Auxiliary drivebelt - removal,
refitting and tensioning
Removal
6 If not already done, proceed as described
in paragraphs 2 and 3.
7 Disconnect the battery negative lead.
8 Slacken both the alternator upper and lower mounting nuts/bolts (as applicable).
9 Push the alternator toward the engine until the belt is slack then slip the drivebelt from the pulleys. Where an adjuster bolt is fitted, back off the adjuster to relieve the tension in the drivebelt, then slip off the belt (see illustration).
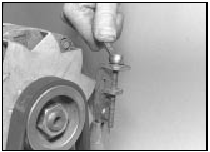
9.9 Slackening the alternator adjuster bolt to release the auxiliary
drivebelt
Refitting
10 If the belt is being renewed, ensure that
the correct type is used. Fit the belt around
the pulleys, and take up the slack in the belt
by moving the alternator by hand, or
tightening the adjuster bolt.
11 Tension the drivebelt as described in the following paragraphs.
Tensioning
12 If not already done, proceed as described
in paragraphs 2 and 3.
13 Correct tensioning of the drivebelt will ensure that it has a long life. A belt which is too slack will slip and perhaps squeal.
Beware, however, of overtightening, as this can cause wear in the alternator bearings.
14 The belt should be tensioned so that, under firm thumb pressure, there is approximately 5.0 mm of free movement at the mid-point between the pulleys on the longest belt run.
15 To adjust, with the upper mounting nut/bolt just holding the alternator firm, and the lower mounting nut/bolt loosened, lever the alternator away from the engine, or turn the adjuster bolt until the correct tension is achieved. Rotate the crankshaft a couple of times, recheck the tension, then securely tighten both the alternator mounting nuts/bolts. Where applicable, also tighten the bolt securing the adjuster strap to its mounting bracket.
16 Reconnect the battery negative lead.
17 Refit the plastic cover to the wing valance.
Refit the roadwheel, and lower the vehicle to the ground.


